Sunday 27 January 2013

Valentines Day Felt Flower Love Wreath

I have another Valentines Day wreath tutorial to show you today!! it took me over 2 weeks to finish, but I am excited with how it turned out.

Valentines Day Felt Flower Wreath
Here is the finished product, to find out how to make your own please keep on reading!

 Supplies you will need:


  1. A Wreath - I got my wreath at Michaels for $9.99, it is a 12 inch wreath and it is a flat type of wreath.
  2. Felt - I bought 20 pieces of red felt and 5 pieces of pink felt. I bought them at Michaels for $0.50 a square. 
  3. Ribbon
  4. Pins - you can use flat ended pins, but I used pearl headed pin because I bought a ton on ebay for cheap.
  5. Scissors
  6. Something to use to trace your circles.
Step 1: Trace and Cut your Circles


Find a item that is the same size you want your circles; I used a shot glass for mine because I wanted smaller circles, but you can use a glass or other item if you want bigger ones. I then traced and traced and traced and cut for it seemed like forever. This is by far the part that takes the longest and if it wasn't for the movie Pitch Perfect I would have lost my mind during this step.

Step 2: Fold and Pin


To make the felt flowers you are going to want to fold the felt circle in half (Picture 1) and then fold it in half again (Picture 2). Afterwards, you are going to put your pin down the center of the flower (Picture 3 and 4), and place it into the foam wreath. Repeat all the above steps over and over again until your wreath is full. 

To make the "Love" section of the wreath I used the pink felt circles and folded them as described above and the created the word. It took a little tweaking here and there to get it right, but in the end it wasn't hard to do. If your letters look a little strange, they will look better once you add the red flowers to help keep their structure. I actually suggest doing the word first and then filling in with red afterwards. I started doing the red first (as seen in the pics) and ended up having to take apart sections afterwards.

Step 3: Apply your Ribbon
I don't have a picture for this part, but you basically just cut the ribbon to size and glue or pin it to the back of the wreath. 

Step 4: Hang it up and Admire it
Valentines Day Felt Flower WreathValentines Day Felt Flower Wreath
 Valentines Day Felt Flower Wreath

The great thing about this wreath is you can do any colour and use any word, so it doesn't technically have to be a Valentines Day wreath.

Thank-you for reading!

-Kristen

Monday 14 January 2013

NEW CAR!!

Hey Everyone! So I know I promised to show you my new car, so here it is! I picked it up today and it is sitting in the garage safe and sound. :) I am so happy.


Here is a extra nerdy picture of me with my awesome new car!

Embellished Argyle Yarn Wreath

Note: for the tutorial on how to create the Argyle Yarn Wreath, please go here.

In my previous post I was talking about how I thought the argyle yarn wreath I made was kind of plain looking. I put a lot of thought into it and decided to incorporate all the materials in the wreath to jazz it up a bit, so I made two large and two small felt roses, a rose using the wired ribbon used to hang the wreath, and two little pom poms out of the Yarn. I love how it turned out!


What do you think?

Thank-you for reading!

-Kristen
http://craftsandnails.blogspot.com

Saturday 12 January 2013

How to Make a Argyle Yarn Valentine's Day Wreath

I am pretty upset that I have to wait until Monday to pick up my new car; they just got it into the lot today and by the time I would of got there after work all the insurance and registration places would have been closed. :( I am a little disappointed, but since Ricky and I are going to Canmore for the night on Saturday I can keep my mind busy and not think about my car. To help keep me distracted tonight I decided to make a Valentines Day wreath for my office door (to replace the Christmas one still hanging there). My inspiration was a picture of a argyle yarn wreath on pinterest, but unfortunately the link to the website was broken. It looked pretty easy to make so I just winged it and it came out pretty awesome. My only problem is that it is kind of plain looking, but I'm still debating on how to glam it up a bit.
Argyle Yarn Wreath

 Supplies you will need:

  1. Wreath: I used a 14" wreath I got from Michaels for $9.99.
  2. Yarn: I bought 268 Yds of True Grey yarn made by Loops & Threads; I didn't even use half of the   "ball" of yarn for the wreath. I bought the yarn at Michaels for $5.99.
  3. Felt: You only need one sheet of red and one sheet of pink felt for the wreath. I got my felt at Michaels for $.49 each.
  4. Ribbon
  5. Hot glue gun and glue
  6. Scissors
  7. Pen or marker 
Step 1: Tape the end of the yarn onto the wreath; this will be the start of where you are going to wrap the yarn around the wreath.

Step 2: Start wrapping the yarn around the wreath going over the area you taped to reinforce it. It doesn't have to be perfect you can wrap it around the wreath many times as shown in picture 1 and then tighten it and align it by pushing it carefully towards the other area you completed (picture 2). I found that this was the easiest way to get a lot of it done fast.
 
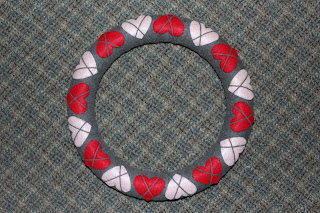
Step 3: The finished wreath will look like the above pictures; you can slip knot, glue and/or tape (I did all three because i'm a little obsessive) the end of the yarn, but don't cut it because you will be using it to wrap around the hearts. Remember that this part is the back of you wreath.

Step 4: Cut a heart template for tracing out of paper, I just folded a paper in half then cut the heart pattern, but you can always print one off the internet too. Once you have your template trace a bunch of hearts onto your felt and cut them out. Do the same for the red hearts on the red felt, using the same heart template you created. :)

Step 5: Now place the hearts on the wreath the way you like them and hot glue them to make sure they stayed put. (Excuse my chipped polish in the picture, I slammed my thumb in a dresser drawer)

Step 6: Then you are going to take the yarn that you secured on the back of the wreath and begin to wrap it around the hearts; You want the yarn to go across the middle of the heart.

                                     Argyle Yarn Wreath
Step 7: Once you have gone around the wreath a complete time, it is time to do the same thing the other way around the wreath. So you are basically making a "X" over the hearts creating the argyle pattern. When you have completely gone around the wreath again, glue the end on the back of the wreath with the hot glue gun and cut the yarn so it isn't attached the ball anymore.  
  
Step 8: Lastly, glue a ribbon to the back of the wreath for easy hanging. 

Here is another picture of the wreath finished! OOOOO LA LA! 

 Here are some pictures of the cats "helping" me out along the way. I have no idea what it is with cats and wreaths, but they go nuts over it. 

This wreath is super cheap to make, about $20, but was pretty time consuming. It took me over 4 hours to complete the wreath from start to finish. 

What are your Valentines Day plans? What crafts are you doing for Valentines Day?

Thank-you for reading!!

-Kristen