Wednesday, 26 December 2012

How to Make a Nail Polish Ring

There is nothing I love more than when nail polish and crafts collide! I have been doing nail polish rings for awhile now, and decided to show you how to make one.

Supplies you will need are:
 
  1. Nail polish of your choice: I chose China Glaze's Get Carried Away.
  2. A ring base: You can get them on ebay for super cheap! 
  3. A clear cabochon: You will have to make sure that the cabochon will fit into the ring base. You can also purchase these on ebay for super cheap!
  4. Glue: I use E-600 because it works well, but you can try out some different glues to see what works for you. 
Step 1: Paint the Cabochon
Put the cabochon rounded side down onto a flat surface (the flat side will be up), and paint a layer of nail polish onto the flat side. Make sure you let it dry completely and add another coat, keep doing this until the nail polish is opaque when you turn the cabochon around. It took 4 layers of Get Carried Away to become opaque. You can use any polish for this step and you can even layer different polishes to get a textured look. Just remember that the last layer you would put on your nails, will be the first layer you would put on the cabochon. Therefore, if you are using a sparkled top coat put it on first and then use your base colour(s).

Step 2: Glue it on the Base
Once the nail polish is completely dry add a small amount of glue to the ring base and gently place your cabochon (flat side down) onto the glue, gently press the cabochon down with your fingers. It is really really really important not to put too much glue on the ring base, if you add too much it will spill over the sides when you put the cabochon on.

Step 3: Wear it!
Once the glue has dried, put it on your finger and wait for all the compliments you will get on your awesome nail polish ring.    

What nail polish did you use for your ring?

Thank-you for reading!

- Kristen
http://craftsandnails.blogspot.com

Sunday, 23 December 2012

Memory Keeper Necklace

One of the crafty things I do is make jewelery. This year I was having problems figuring out what to get Caitlin for Christmas and during a trip to Michaels it dawned on me to make her a little memory keeper necklace featuring her niece! I am sorry I don't have a tutorial for this necklace, but it is really hard to photograph the steps on how curl wire, make the letter charms, etc. If you know the basics on how to create jewelery it would be very simple to figure out what I did based on the pictures :)

 One side of the necklace has a picture of Cait and her niece and the other side has a picture of two birds on a wire. I did this in case she didn't want to show her whole classroom (she is a teacher) a pic of her and her niece. Also, it is good to have options. The C and M charms I made out of Sculpey and I love how they turned out! All supplies for the necklace can be found at Michaels.

 
 Here is a pic of the necklace on Caitlin. SHE LOVED IT! 

The necklace is a great way to wear a memory! The best thing about it, is that you can even open the frame and change the pictures. 

Thank-you for reading!

-Kristen


Wednesday, 19 December 2012

How to Make a Baby/Toddler Tutu

I am so excited to share this tutorial!!! It turned out so darn cute!!! Now that I have you all wondering what I'm all excited about...... TAKE A LOOK!

 Caitlin, her sister Becky (Miriam's Mommy), and I made a baby tutu for Miriam! Even though she looks pissed off in the picture, she loves her tutu! 

The supplies you will need for the tutu is:
  1. Tulle - I used tulle that was 6 inches wide and came in a spool that was 20 yards long. I did not use all 20 yards on the tutu. How much tulle you use depends on how long you want the tutu to be and of course the size of the baby, toddler, or child you are making it for. I bought my tulle at Michaels and off ebay.
  2. A crochet headband - I used one that is meant for an adult, for a new born baby you can use a baby crochet headband, for older kids and toddlers I would suggest buying elastic and then using that as the part for around the waist. I bought the crochet headband at Sally Beauty Supply for $.99.
Step 1: Cut the Tulle
We cut the tulle 12 inches in length, we cut enough beforehand to do the complete tutu. This is not an exact science, we just eye balled it and ended up with a couple left over in the end. Remember that since we will be using the slip knot, the finished tutu will only end up being 6 inches long. You do not have to use the same length as us, if you are making the tutu for a brand new baby go shorter, for a toddler/child go longer.

Step 2: Steady the Crochet Headband
I placed the one we were working with on a giant jar of peanut butter. It was the perfect size. 


Finished Tutu
Step 3: Slip Knots Galore!
We decided to make the top layer of our tutu baby pink of course! To create the top layer take one piece of your cut tulle and fold it in half (picture 1), then put the loop through one of the loops of the crochet headband (picture 2), now take the end of the tulle and put it through the loop and pull tight (picture 3), the slip knot once it is completed will end up looking like picture 4. Keep doing the same thing over and over with the tulle you cut until you have completed the whole first layer (picture 5).

 
Step 4: The Second Layer
We went for a nice light yellow for the second layer. You will basically do the same thing you did for the first layer. However, since you are using the second row of the crochet headband there is a slight adjustment on how you will put your tulle through the headband. As you can see from pictures 2 and 3 you will need to put the loop through one hole and then back out the hole directly above it. Then you would use the end of the tulle put it through the loop and pull tight just like before. Keep doing that until you are done the whole second layer. Once your have completed the second layer you are done and ready to dress up your favourite little girl!

Here is a picture of Becky working on the tutu and Caitlin smiling for the camera! (this is a cell phone pic)

 Here is another picture of Miriam LOVING her tutu! The flash was really bright so I got more deer in the headlights pictures of her instead of ones where she is actually smiling.

A couple of things to take note:
  1. You can do solid layers like we did, or you can mix it up by alternating one pink and yellow on the same layer.
  2. You don't have to stop at two layers, you can actually put up to 4 layers on the crochet headbands (depending on the one you get of course). We stopped at two layers because we were worried it would be too much for Miriam when she was crawling if we did more.
  3. For older girls you can always glue on sequins, rhinestones, flat pearls, etc onto the tulle to decorate it. We obviously didn't do that cause little objects and babies don't mix well.  
How did your Tutus turn out? What colours did you use?

Thank-you for reading!

-Kristen
http://craftsandnails.blogspot.com

Monday, 10 December 2012

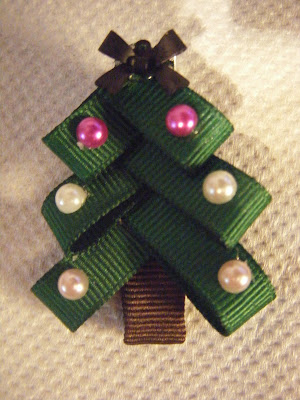
Make your own Christmas Tree Hair Clip

I have a super cute craft to show you today. Ever since my friends niece was born, I have been making her little hair bows. I even went as far as making her a hair bow/clip holder. With Christmas right around the corner I decided to make her a cute little Christmas tree hair clip, my inspiration was from pinterest.

Christmas Tree Hair Clip
 Here is the finished product, soooo darn cute! 

The supplies you will need are as follows:
  • Green 3/8 inch grosgrain ribbon - I bought it at Michaels 
  • Brown 3/8 inch grossgrain ribbon - I bought it at Michaels
  • Alligator clip - I used a double pronged alligator clip, but you could use a one or two pronged one. I bought 20 clips on ebay for $4.97 with free shipping. 
  • Pearls, rhinestones, sequins, or other things you would like to decorate it with. - I used stick on pearls that I bought at Dollarama for $1.00. 
  • Something for a bow tree topper - I used a little bow charm I had left over from another project, but you can use a ribbon to create a bow.
  • Scissors
  • Glue gun and glue sticks
 
Take the brown grosgrain ribbon and hot glue it to the alligator clip. It will form the trunk of your Christmas tree so it isn't necessary to cover the whole clip. As you can see from the pictures I just glued the ribbon on the top and bottom of the top clip portion.  

 Cut two 4 cm, two 5.35 cm, and two 6 cm pieces of green grosgrain ribbon.

Then place a dot of hot glue on the edge of the ribbon and glue to edges together forming a loop (shown above). Do the same thing with all 6 pieces that you just cut. 

 Then glue the loop edges together to make triangles, this will form the branches of the tree.

 Now it is time to glue them onto the alligator clip starting with the biggest branches first. 

 Then glue on the second largest branches, making sure you overlap it slightly over the larger branches.

 Then glue on the smallest branches that will form the top of the tree; again make sure that you overlap it a little over the second largest branches.

 Now it is time for the tree topper. I hot glued a bow charm to the top of the tree, but you can also make a bow out of ribbon and glue it to the top of your tree. 

Lastly, it is time to decorate!! I used stick on pearls that I double secured with hot glue on the end of each branch. This is purely preference, you could decorate it with glitter, rhinestones, sequins, etc. 

Christmas Tree Hair Clip
Let everything dry and you are ready to place it in a little girls hair, or on a baby headband! It is a great accessory for any little girls Christmas outfit! 

Thank-you for reading!!

-Kristen

Saturday, 8 December 2012

Super Easy DIY Bead Christmas Ornaments

While I was organizing my crafts supplies, I noticed an abundance of beads that I will never use. I had recently bought some clear Christmas balls at Michaels for $.99 each that you can remove the top off of them and place items inside. I decided to put all the unused beads into the Christmas balls and hung them on my tree :). They are super simple to do and are really pretty on the tree when the lights dance off all the different beads. I did one with seed beads and larger clear beads from a broken necklace, and another one with larger beads in a variety of colours.

Bead Christmas Ornamanents
 Bead Christmas Ornamanents

Ps. The tutorial for my nails can be viewed here.
 
Thank-you for reading!

- Kristen
http://craftsandnails.blogspot.com

Sunday, 2 December 2012

DIY Glitter Light/Plug Covers

I still haven't finished painting my craft/guest room. It seems to be taking forever!! We painted the trim an I'm not sure why I even bothered taping it because it bled and now I have purple paint on my grey/blue walls :(. I am going to spend tomorrow touching up all the places it bled, but all this made me realize that even though I can paint a canvas I am useless at painting walls. Oh well... it will eventually be done; I just have to keep working at it until it is right. Anyways, I'm sure many of you can relate to having ugly, mismatched, or broken light/plug covers that don't match your room. I was going to buy new ones for the room, but OH MY GOODNESS nice ones are expensive! I decided to just revamp the existing ones, with a glitter tutorial I saw on pinterest. Okay... lets get started!

This is what the covers looked like before......ewwwww eh?
This is the finished product, so nice and pretty and sparkly! 


Supplies you will need:
  1. Mod Podge: I started off with Matte for the first 4 coats and then for the last two used a gloss, you can use gloss the whole time to save on buying two different types. I got mine at Michaels for $14.99 for a 473 ML bottle.
  2. Sparkles/glitter: The one I used was a extra fine glitter made by Recollections and the colour is called Muse. I bought it at Michaels and it was $6.99 for a 1.5 oz bottle. I used probably 15% of the bottle for all 4 covers, so you can get away with buying a smaller bottle of glitter. Also you don't have to use extra fine glitter you can use bigger glitter, little moons or stars, hex glitter or even bar glitter on your covers. It really depends on who you are creating them for. I went for the extra fine because it is a more sophisticated look; if it was for a kids room I would have mixed it up with different glitters.
  3. Foam brushes
  4. A Piece of Scrap Book Paper: A colour that is close to the glitter you will be using. You can completely skip the scrap book paper covering if all your covers are the same colour. I used the paper to cover up a crack in one of the covers and because they were so many different colours.
  5. Scissors
  6. Patience  

 First cut the scrap book paper a little bigger than your cover and cut out the holes for the plug or light switch.
Then cut diagonal slits in the corners of the paper, basically you are cutting them in the corners until you meet the corner of the cover. Then use the mod podge and and foam brush and put a generous amount of it on the top of the cover and line up the paper smoothing it down. Then turn the cover around and glue one of the sides down.
 Then glue another side down and hold them down until they stay on there own.
 Then cut the extra parts off the ends, so the paper is flush with the bottom of the cover.
 Then do the same for the other two sides by gluing, holding, and then cutting off the excess.
 
 Then use a pen to poke holes where the screws go. As you can see in the pic there is some wrinkles in the paper, I used my debit card to carefully move the bubbles towards the middle of the cover until they released out the middle cut part.
I then mixed 1/4 cup of Mod Podge with 15% of the sparkles, this isn't an exact science. Use as much glitter as you like. In the future I would put more in, because it took me 6 coats to get it opaque. I am assuming the more glitter you use the less coats you will need. Anyways, make sure you let the Mod Podge dry completely before you put on another coat (about 15 minutes). Also, don't be afraid that it is cloudy when it is wet, it dries clear. :)

Glitter Light/Plug CoverGlitter Light/Plug Cover
Glitter Light/Plug Cover
 The last step is to put it back in your room!

There you go!! Now you can make your very own glitter light/plug covers!!!

Thank-you for reading!!

-Kristen
http://craftsandnails.blogspot.com